
In Parts 1 and 2 of this series, we covered why Confirmation Rules matter and how to build them in OneStream. Over time, working with these rules in live applications has highlighted a second layer of design considerations that don’t always show up during testing. This post focuses on those lessons learned, how consolidation timing, workflow setup, tolerances, and SQL based validations shape how Confirmation Rules behave in practice.
Consolidate First: Why Confirmation Depends on Consolidation State
Confirmation Rules evaluate the data that exists at runtime. If a consolidation hasn’t completed, the rule is validating partial results.
This commonly causes issues when rules reference:
- Parent level balances
- Accounts affected by eliminations
- Calculated values
- FX translated values
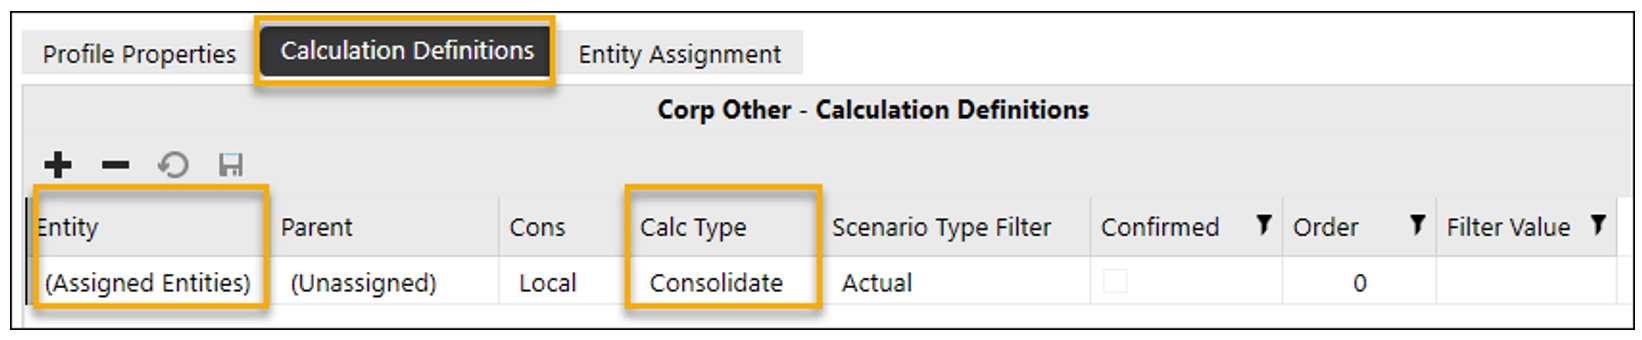
Within the Workflow settings, you can define a Calculation Definition that controls what processes execute during the Process step of the workflow. Configuring this correctly ensures the appropriate calculations run after data loads and before users attempt to confirm.
In the example below, the Process step is configured to run a Consolidation for the entities assigned to the workflow. This ensures confirmation logic evaluates consolidated results rather than incomplete intermediate data.
Confirmed Switch Value: Understanding When Your Rule Actually Runs
By default, Confirmation Rules run for the entities assigned directly to a workflow. In many cases, this behavior is sufficient. However, there are situations where you may want confirmation logic to evaluate a broader set of entities.
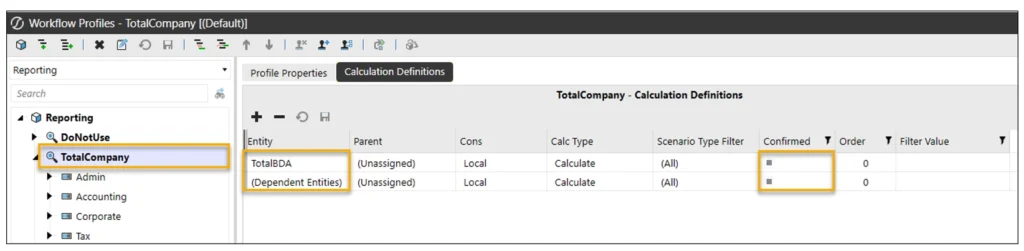
You may have noticed the Confirmed column in the workflow configuration in the previous section. Selecting this option changes which entities the Confirmation Rules run for during the confirmation step.
In the example below, a Total Company workflow has been created, with all other workflows rolling up underneath it. When Dependent Entities is selected, Confirmation Rules defined on the Total Company workflow will run for all entities assigned to workflow profiles below it.
In this setup, the parent entity TotalBDA is also explicitly assigned to the workflow. As a result, Confirmation Rules run for both:
- All dependent child entities
- The parent entity itself
This approach allows confirmation logic to be centralized and evaluated at the appropriate point in the close process, in addition to within each child workflow.
Using a Parent Workflow as the Final Checkpoint
Building on the example above, it is often useful to include a parent workflow where Corporate can run a final set of confirmation checks for the period across all entities within their scope.
This approach is not limited to the top of the organization.
Parent workflows can also be defined at sub consolidation levels, such as:
- A regional controller reviewing all Europe entities
- A business unit reviewing a defined group of entities
In many cases, there are also additional confirmation checks that should only run at the parent level. These validations often rely on consolidated results, eliminations, or cross entity relationships and do not make sense to enforce at the individual business or entity level.
By centralizing these rules at the parent workflow, teams can:
- Run checks that depend on fully consolidated data
- Avoid blocking individual entities with irrelevant validations
- Maintain a clear final checkpoint before submitting the period
This pattern keeps entity workflows focused on data preparation while reserving higher level integrity checks for the appropriate consolidation level.
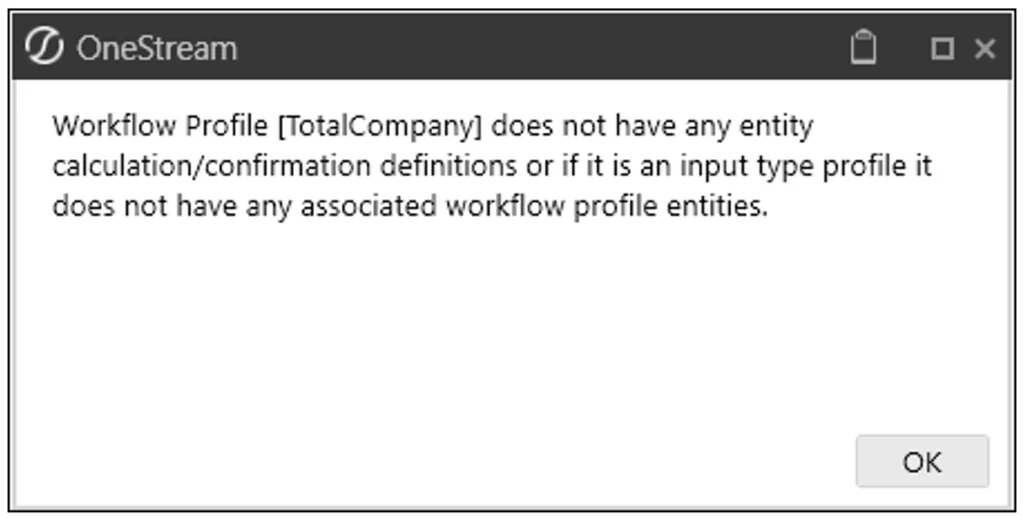
Important: Refer back to the Confirmed Switch Value setup described in the previous section. If the Confirmed option is not configured correctly for a review or parent workflow, Confirmation Rules will not evaluate dependent entities, and you will encounter the error below when attempting to run the rules.
Handling Near Zero Balances
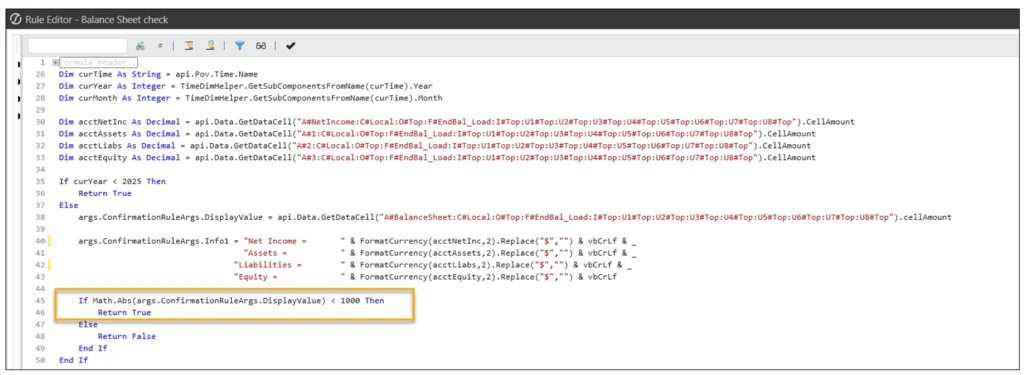
Exact zero checks rarely hold up in production environments. FX translation, allocations, and rounding almost always introduce small residual balances.
Using strict equality logic (= 0) often results in confirmation failures that are technically correct but practically irrelevant. A better approach is to:
- Use absolute value thresholds
- Define tolerances that align with materiality
- Apply consistent thresholds across related rules
- If the client wants a 0 threshold recommend using 1 instead
This keeps Confirmation Rules focused on meaningful issues rather than noise introduced by calculation mechanics.
Going back to the example from the previous post you can see how a threshold was established.
Using SQL in Confirmation Rules
Some validations cannot be performed using cube data alone. The first time I came across this was when I was trying to run a Confirmation Rule that checked certain data intersections for a Cell Attachment. Data Attachments are not stored in the Cube the same way that comments on the View member are. To compare to a table, you will need to define your SQL query and the table you want to query and establish a connection to the table.
See example below:
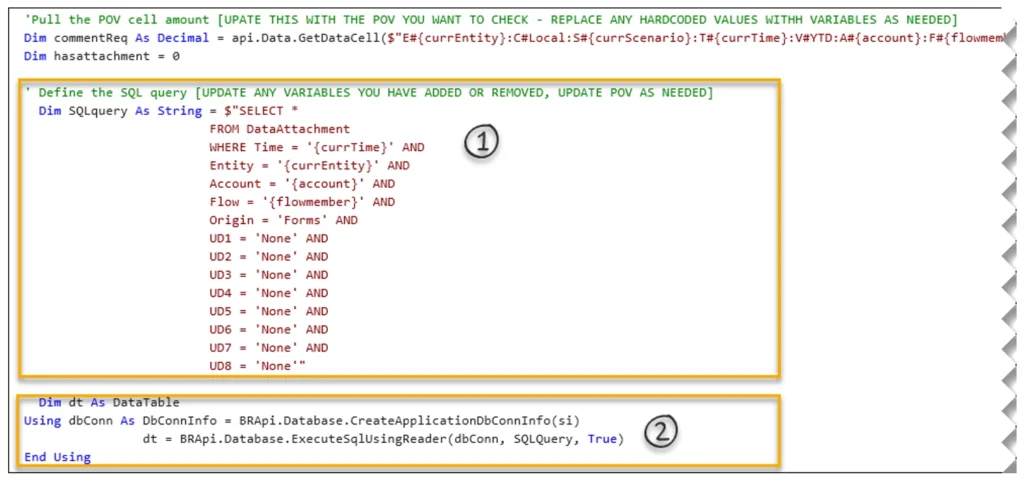
- Defining the SQL Query
This section builds the SQL statement used to check whether a cell attachment exists for a specific intersection. The query targets the attachment table and filters it to a single POV by matching the dimensional values for the intersection where the data resides.
In this example, additional variables (not shown in the screenshot) are used to ensure the query dynamically aligns to the exact POV being evaluated, rather than relying on hardcoded values.
The query is designed to answer a simple question: Does at least one attachment exist for this cell? The actual attachment content was not required for this validation.
2. Executing the SQL Using BRApi and DbConnInfo
The DbConnInfo object is used to establish a secure connection to the OneStream application database using the current application context.
The SQL is executed through BRApi, which ensures the query runs within OneStream’s security and session framework. The results are returned into a DataTable, which makes it easy to evaluate whether any matching attachment records were found.
At this point, the Confirmation Rule can simply check:
dt.Rows.Count > 0 → attachment exists
dt.Rows.Count = 0 → no attachment exists
This result can then be combined with cube logic to determine whether the Confirmation Rule should pass or fail.
Wrapping it All Up
Through this series, the focus has been on designing Confirmation Rules that align with how data is loaded, calculated, consolidated, and reviewed. From identifying the checks that protect the close, to building them correctly, to refining how they behave in production, the goal has been to embed financial judgment directly into the close process.
When these elements are considered together, Confirmation Rules validate meaningful results instead of intermediate states, creating a confirmation process that supports the close rather than slowing it down.
If there’s anything else you’ve learned along the way that you’d like to share, we’d love to hear it in the comments.