Go with the (Work)flow
The Workflow is the primary point of interaction for users loading or inputting data in OneStream. Every OneStream project utilizes Workflows so here are five ‘tips’. These are items that I did not know existed for way longer than I would like to admit. Hopefully at least one of them helps you.
- Grid View:
Let me start by saying I use Grid Views for editing/reviewing dimensions all the time. I was sitting on site with my colleague Melissa McAdam one day and in frustration said, “Why isn’t there something like Grid Views for Workflows?” to which she replied “There is.” She proceeded to change my life. I am not even being dramatic here. (Note I also came across this a few months later doing my recertification training – props to the new OneStream training courses!)
To get to the Grid View in Workflows you must be on the top-level Workflow, from here go to the Grid View tab and click the Grid Settings button.

Next, select your Profile Type, Cube Type, and Gird Columns To Display selections, and click Ok.

Just like that your grid will display.

I find this particularly useful if I need to make a change to Matching Parameters as setting these can be a pretty manual process if you have an application with many Workflows. You can simply copy and paste within the grid when making a mass update or adding an additional plug account.
- Central Workflows:
This was another classic case of me wondering why OneStream did not have a setting, only to find out low and behold it was there all along, hidden in plain sight.
The ask was to have Topside entries only allowable by Corporate, but to be able to post in entities outside of the Corporate Workflow. To do this the Adj Workflow has to be set to Profile Active = True. But I didn’t want the users of all these Workflows to have to manually Complete the Workflow each month. If only there was an easy way to get this set up.
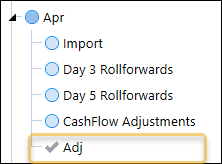
OneStream has you covered here. All you need to do is change the Adj Workflow Name to Central Journal Input.

The result of this is a gray check mark on the Adj Node, users of that Workflow will never have to manually intervene.

- Running a confirmation rule at an aggregated level
This request came from a client who had both Legal Entities and Plants within their entity dimension. Balance Sheets would balance at the legal Entity level not the Plant level and some Workflows contained both Plants and Legal entities.
For this I was able to use a Select Case Statement to check Plants at a Tot level while Legal Entities had a check running at the base entity level.

- Direct Workflow
This is one I stumbled upon when searching through my Workflow Name options. Being on Consolidation projects it makes sense I didn’t know about this one. Direct Workflows (added in 6.4) can be used when planning users do not require the same type of audit history required by most Consolidation loads. This method of loading does not create storage for the Source and Target record detail which gives it improved performance. This can be used for loads that are more operational in nature and do not require detailed audit or drill back capabilities. This is another option that can be set by changing the Workflow Name.
- Adding a Confirmation to a Workspace
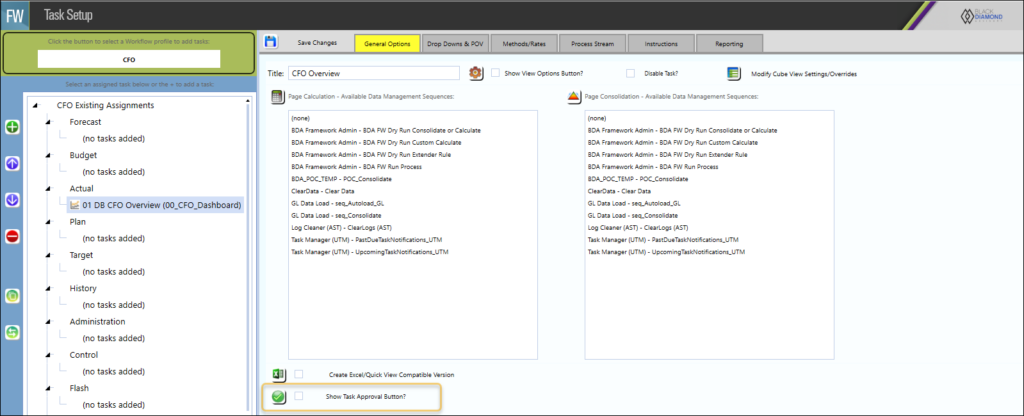
When utilizing BDA’s Core Technology this can simply be done by checking a button on your Task Setup.

This results in a check mark appearing which can be clicked to indicate a task is done and add comments.


If you do not have BDA’s Core Technology installed, you are not out of luck, you’ll just need a few more steps.
You will need to create a Button Component and a Business Rule. You can then attach your Business Rule to your button as a Server Task Action. You will need to reference your Business Rule, Function Name, and set your parameters to reference the Workflow:

You can attach this button to the top of your dashboard and users will be able to click to Confirm and Revert this Workflow item.


